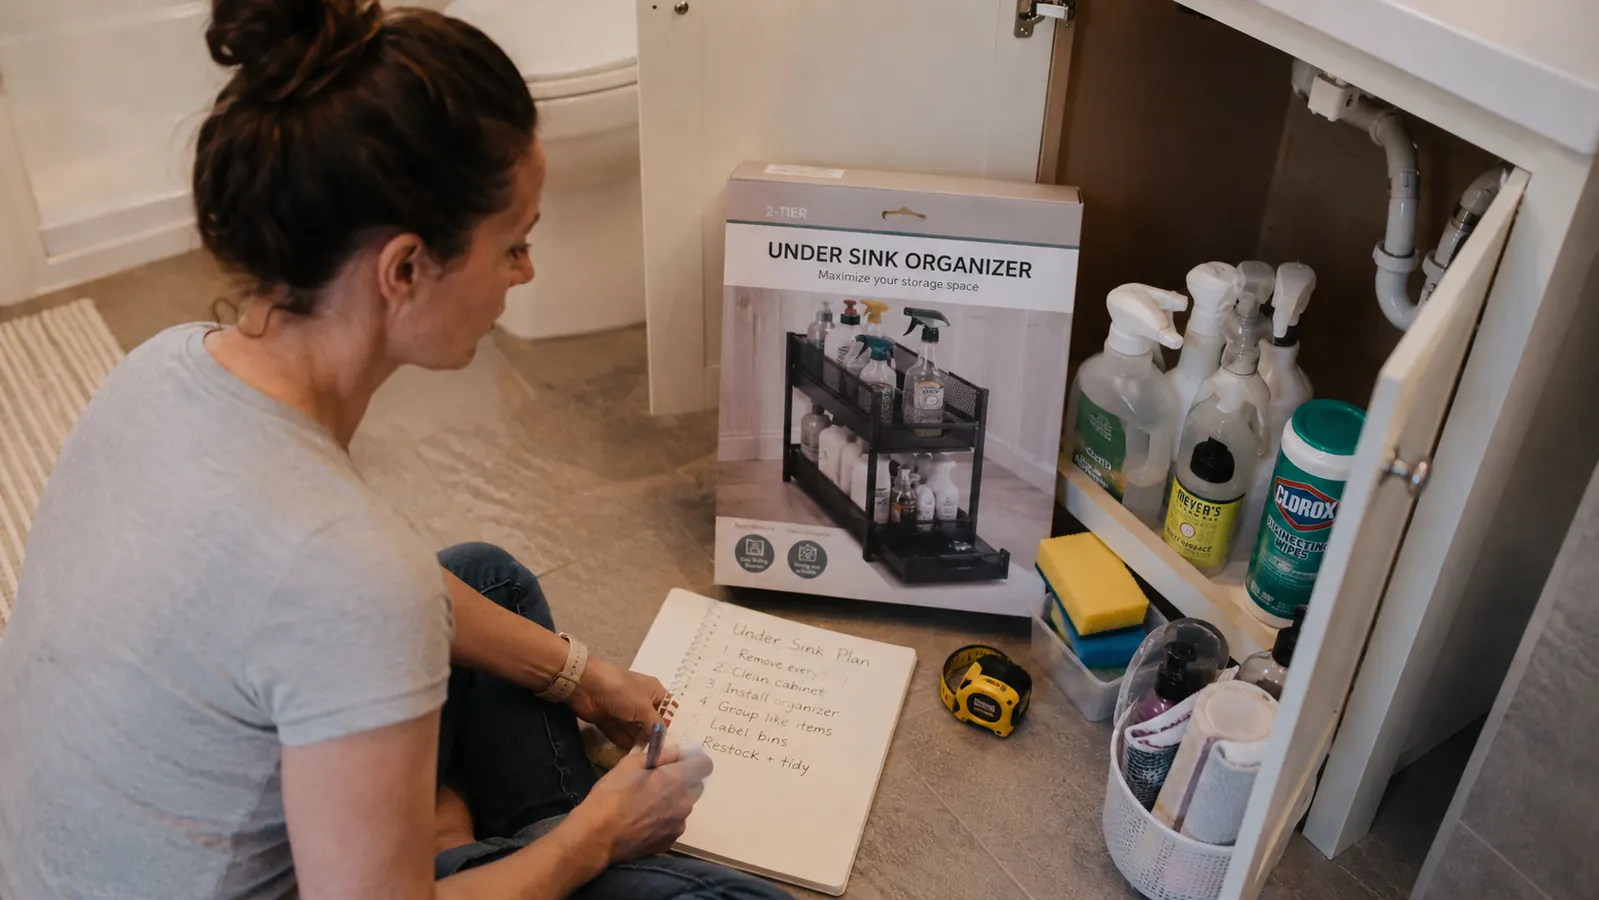
Here is what the cabinet under my rental bathroom sink looked like six months ago: a half-squeezed tube of grout cleaner, three bottles of shampoo I never use, a flat pack of toilet rolls jammed sideways, and a rusted can of something whose label had completely peeled off. Every time I needed the drain cleaner I had to pull everything out, find it, then shove everything back in. It took about ninety seconds every single time. Over a year that adds up to a lot of wasted time and a low-grade daily irritation I finally fixed with one madesmart 2-Tier Bath Organizer for less than twenty-five dollars.
The problem with under-sink cabinets in rentals is not the stuff, it is the shape. You have an awkward rectangular space cut in half vertically by a drain pipe. The pipe sits dead center and makes shelving almost useless unless the shelf has a cutout. Most wire shelf inserts do not. Tension-mounted risers fall down. Hanging caddies on the door work only if your cabinet door is solid and the hinge hardware is right. What actually works in most rentals is a two-tier sliding organizer that is designed around the pipe, sits flat on the cabinet floor, and requires nothing permanent at all. The one I use is the madesmart 2-Tier Bath Organizer, and this guide walks through the exact process of installing and loading it.
The cabinet under your sink could be fixed by Thursday for under $25.
The madesmart 2-Tier Bath Organizer has 40,000+ Amazon reviews and sliding drawers that fit around most standard drain pipes. No tools, no drilling, no landlord permission required.
Amazon Check Today's Price on Amazon →What You Need Before You Start
Before pulling anything out of the cabinet, get three things ready: a trash bag, a measuring tape, and about thirty minutes. You will not need power tools, command strips, or any hardware at all. The only product you need is the organizer itself. I measured my cabinet opening as 22 inches wide by 19 inches deep, which is fairly typical for a rental bathroom vanity. The madesmart organizer runs approximately 17.5 inches wide, 12.5 inches deep, and 9.5 inches tall, which fits comfortably in most standard vanity cabinets while leaving room beside it for taller bottles. Measure your own space before ordering so you are not guessing.
Also take a quick look at where your drain pipe sits. In most bathroom vanities it comes straight down from the sink basin and exits through the back wall. The madesmart unit has a notch in the back panel designed to clear the drain pipe, which is why it fits where a flat-bottomed tray would not. If your pipe is off-center or there is a bulky P-trap fitting sitting low, note that now. In the next steps I will explain how to position the organizer to clear it.
Step 1: Empty the Cabinet Completely and Sort on the Floor
Pull everything out. All of it. Set it on the bathroom floor where you can see it. This step feels obvious but most people skip it by just rearranging things around the organizer, and then wonder why it still feels chaotic six weeks later. When everything is out you can actually see what you have.
Sort into three piles: keep, relocate, and trash. Keep means it belongs in this cabinet because you use it in this bathroom regularly. Relocate means it belongs somewhere else in the apartment, like under the kitchen sink, in a linen closet, or in a storage unit. Trash means it is expired, empty, or you genuinely cannot remember buying it. For most people, about a third of what comes out goes in the trash bag. That is normal. Cleaning out the trash first makes everything else easier.
Wipe out the cabinet floor and the inside walls with a damp cloth while it is empty. In rentals these cabinets collect moisture and grime at the back corners. Getting that clean now means you are not organizing over a gross surface, and it also lets you spot any water damage or active leaks before you load the organizer in. If you see active water damage, tell your landlord before doing anything else.
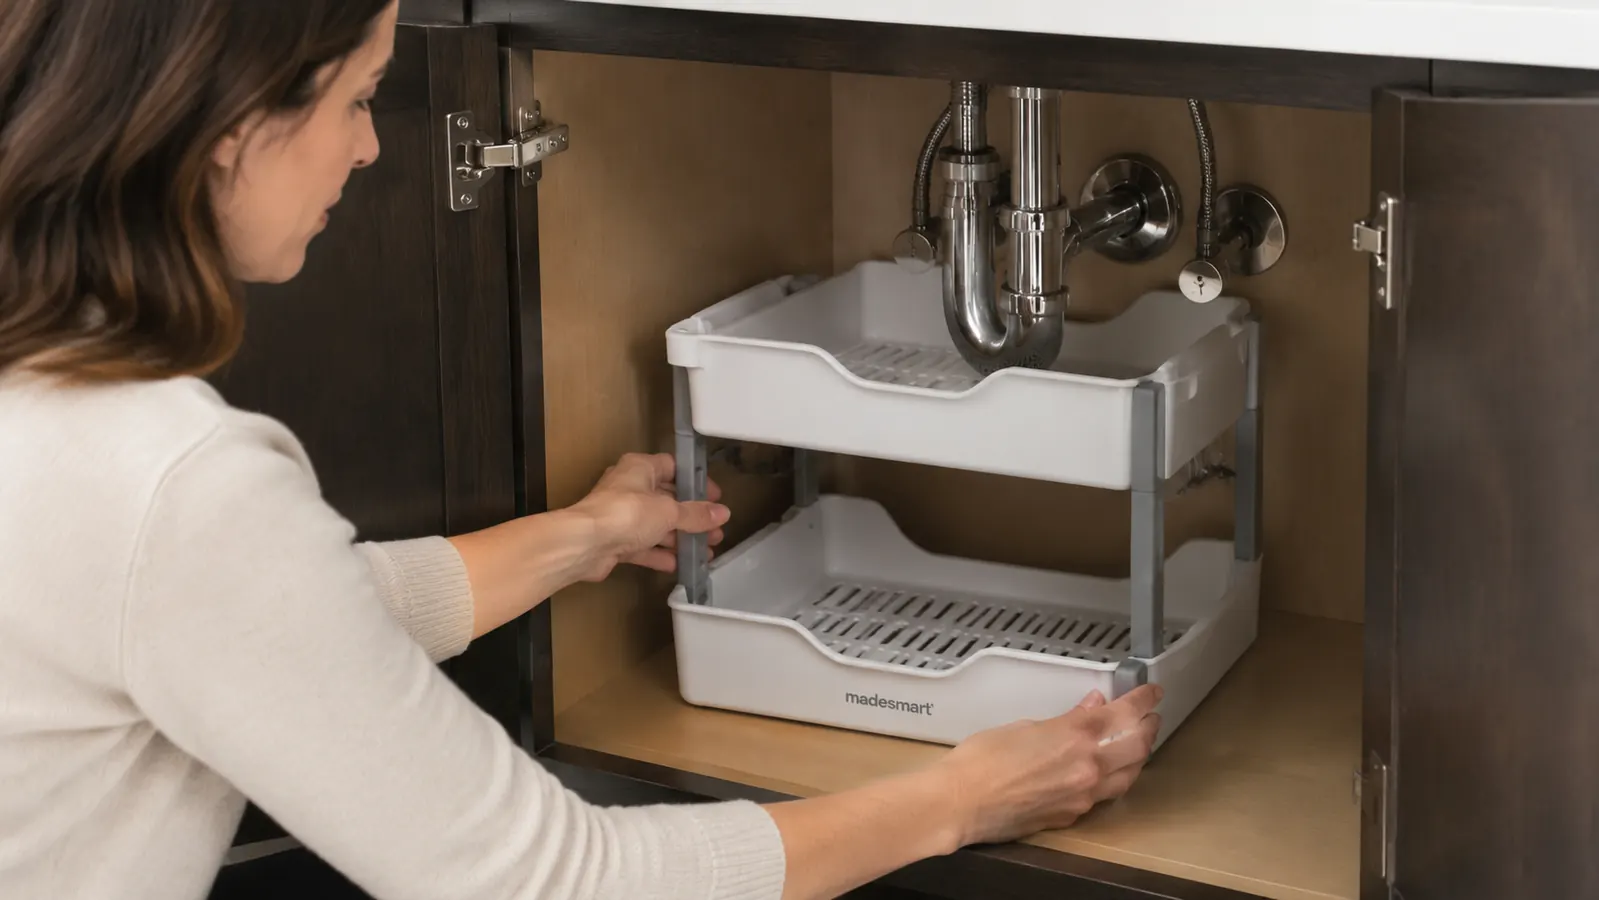
Step 2: Measure the Drain Pipe Clearance and Position the Organizer
Place the empty madesmart organizer in the cabinet before loading it. Slide it toward the back wall until the notch in the rear panel sits flush around the drain pipe. The notch is roughly 2 inches wide and 3 inches deep, which clears a standard 1.5-inch bathroom drain without any modification. If your drain pipe has a large plastic P-trap that protrudes further forward, shift the entire unit slightly to one side so the trap is beside the lower tier rather than behind it.
Check that both sliding drawers extend smoothly without hitting the side wall or the pipe. Pull each one out about two-thirds of the way to confirm clearance. If the lower drawer catches on anything, the unit is probably too far back. Nudge it forward half an inch at a time until both drawers move freely. Once you find the sweet spot, just leave it there. There is no fastening required and no need to mark the position. It stays put by weight once it is loaded.
One practical note: leave a few inches of open space to the side of the organizer, not in front of it. That side gap is where you will store tall bottles like a full-size toilet bowl cleaner or a 32-ounce spray bottle, which will not fit on either tier. Using the side gap intelligently gives you much more total storage than if you tried to cram taller items onto the tiers themselves.
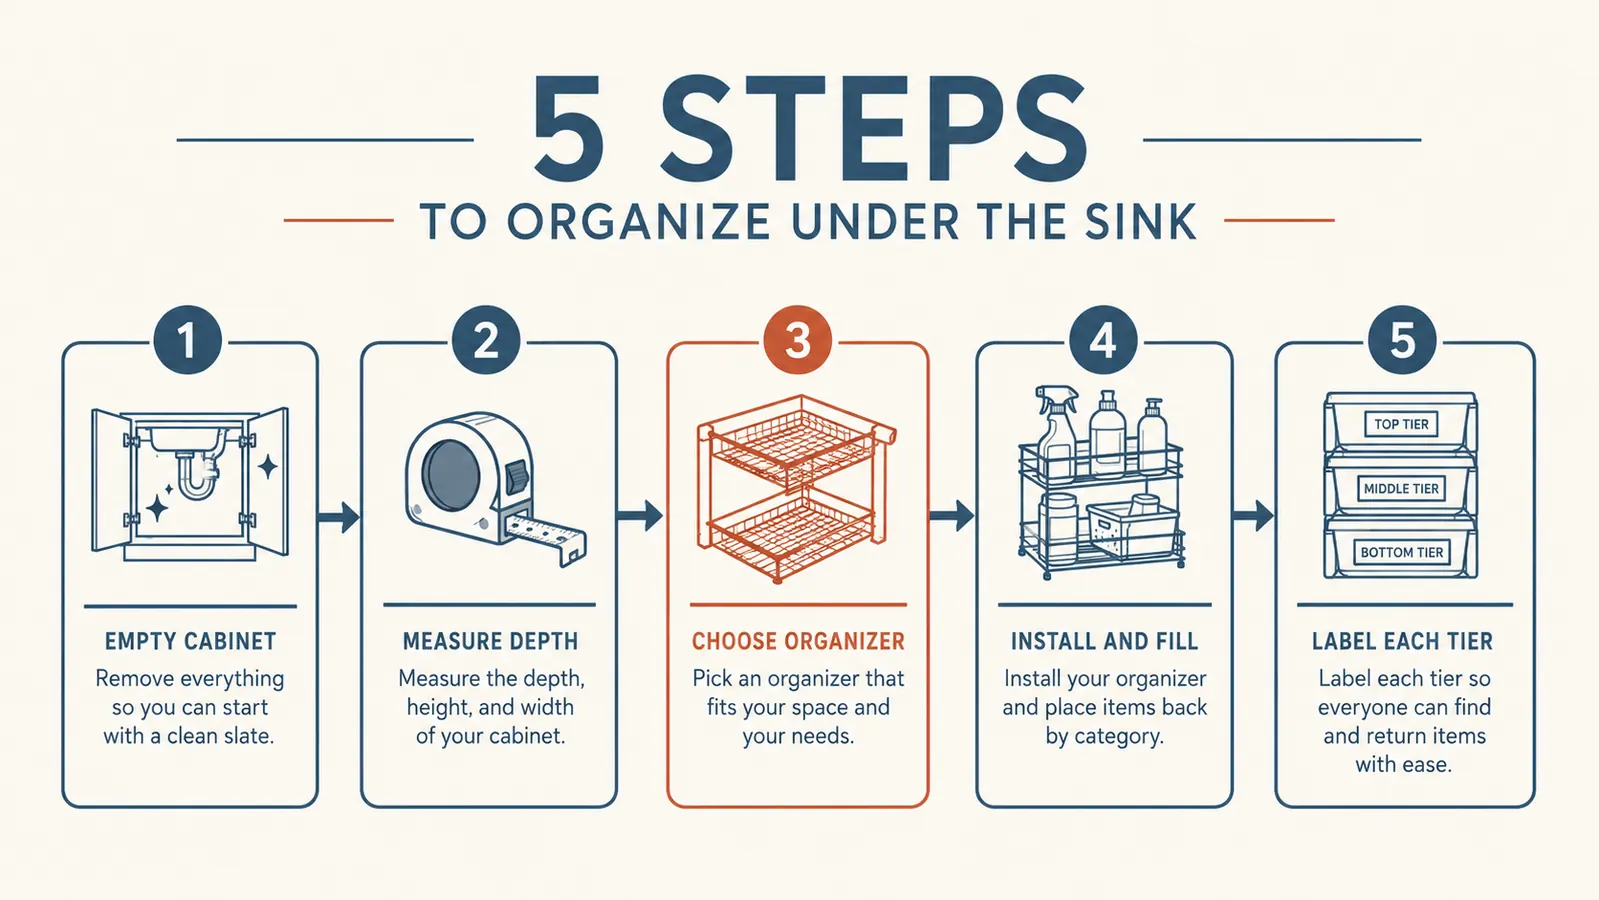
Step 3: Assign Every Category a Tier Before Loading Anything
This is the step most people skip and it is why their under-sink cabinet gets messy again within two weeks. Before you put a single item into the organizer, decide what category lives on each tier. Write it down on your phone if that helps, or just commit to it in your head, but actually decide. Vague loading produces a vague result.
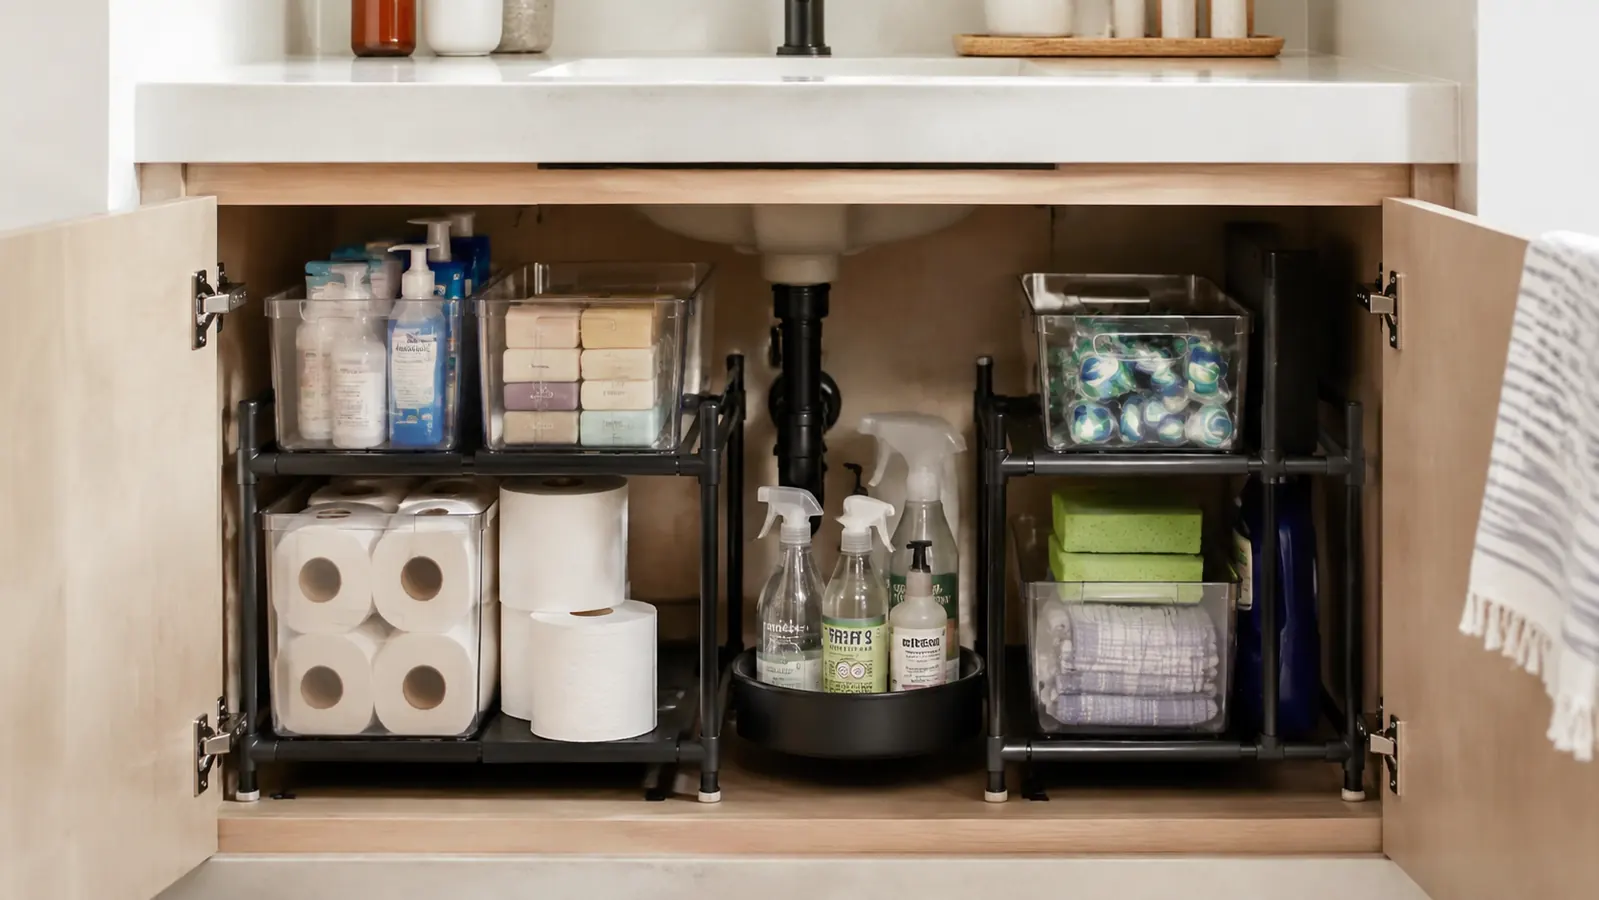
Here is the system I use, which works well for a typical rental bathroom. Top tier: daily-use items that are short enough to fit, meaning soap refills, razors, spare toothbrushes, cotton swabs, and small first aid supplies. These are things I reach for at least once a week. Bottom tier: cleaning supplies that are used less frequently, like toilet cleaner, drain tabs, rubber gloves, and a spare sponge. The bottom drawer slides out so reaching the back is easy even for deep items. Side gap: tall bottles only.
Assign a category to each tier before you load anything. Vague loading produces a vague result, and the cabinet will be a mess again in two weeks.
Step 4: Load the Organizer Heaviest at the Bottom, Lightest at the Top
Load the bottom tier first. Put your heaviest cleaning bottles in the back of the lower drawer, lighter items toward the front. The drawer slides out on smooth runners so the weight distribution matters less than it would on a fixed shelf, but heavier at the back keeps the unit from tipping when the drawer is extended. Spray bottles with triggers should go in last and face forward so the trigger is accessible without pulling the whole bottle out.
Load the top tier next. Keep it genuinely lighter, not just smaller. Cotton swabs, a spare bar of soap, a box of bandages, and small bottles of medicine all belong here. Avoid loading the top tier with full liquid bottles if you can help it. The structure is solid, but the top tier is open-sided and items can shift when you pull the lower drawer. For anything that might roll, a small bin or a folded hand towel on the top tier keeps things in place.
Then stand the tall bottles in the side gap. Use the space directly beside the organizer, not in front of it. Keeping the front of the cabinet clear is the thing that makes the whole system feel functional rather than cramped. If you cannot see the organizer when the doors are open, you have too much in front of it.
Step 5: Relocate the Overflow and Stick to a Reset Routine
Now deal with the relocate pile from Step 1. Anything from that pile that you kept because you were not sure where to put it needs an actual home now. Extra cleaning supplies belong under the kitchen sink or in a hall closet. Seasonal items belong in a storage bin on a shelf. Duplicates belong in a donation bag. The cabinet under your bathroom sink is small and its only job is to serve this bathroom. If something is not used in this bathroom regularly, it should not live here.
Set a three-minute reset for this cabinet once a month. Not a full cleanout, just a quick check that everything is still on the right tier, that trash is thrown away, and that the drawers still slide smoothly. With an organizer in place this takes less time than it sounds. The madesmart unit wipes clean with a damp cloth and the drawers come out completely if you ever need to clean underneath them. In a rental that is exactly what you want: a system you can take with you when you move.
What Else Helps
If you find yourself with a lot of small items on the top tier that keep shifting around, a small open-top bin on the top shelf contains them neatly. A single container roughly 6 inches wide by 4 inches deep by 3 inches tall fits easily on the top tier without blocking visibility. Dollar store bins work fine for this. If you have a larger bathroom cabinet with more than one door opening, consider a second madesmart unit on the other side of the pipe. Two units side by side, each with their notch aligned to the pipe, nearly doubles your organized storage without taking up any additional floor space. Beyond the cabinet itself, applying the same category-before-loading discipline to the rest of your bathroom drawers makes the whole room easier to maintain. If your bathroom drawers are chaotic, the guide on organizing kitchen drawers with a utensil tray uses the same principles and takes about the same amount of time.
Ready to stop pulling everything out every time you need the drain cleaner?
The madesmart 2-Tier Bath Organizer is a no-tools, no-damage fix for rental bathroom cabinets. Rated 4.6 stars across 40,000+ Amazon reviews. Two sliding drawers, fits around standard drain pipes, comes out completely if you ever need to clean under it.
Amazon Check Today's Price on Amazon →